


Application Guide
1 Loudspeaker Placement and System Configuration
AIR-series full-range loudspeakers are designed to reproduce audio with extreme fidelity and a natural-sounding high-frequency response at both low and high volume levels. With any sound reinforcement application, it is important to keep in mind that the performance of any loudspeaker will be influenced by the surrounding acoustics of the listening environment. Difficult environmental acoustics combined with improper loudspeaker placement can interfere with achieving the fidelity performance of which your AIR-series loudspeakers are capable. To help you get the most out of your system, PreSonus has put together this application guide to assist you to avoid some of the common pitfalls of configuring a successful PA system.
1.1 Recognizing Problem Rooms
In most live environments, the room is rarely designed to maximize the listening experience. More often then not, money is spent on aesthetic appeal rather than acoustic treatment. For large-scale tour productions, venues are often sports arenas that have been designed to maximize crowd noise. Smaller music venues are often chosen for location or architectural aesthetics, rather than music reproduction. While an empty warehouse or old wine cellar might make a great environment to hang out in, it’s necessary to recognize and correct what that space does to the sound system in order to optimize a loudspeaker’s performance in the venue.
In general, the following physical features of a room can affect a sound system’s performance:
- Room Size
- Construction
- Reflectivity
The size of the room directly impacts how well certain frequencies will be reproduced. For example, if you measure a room diagonally, you will discover how well that room will be able to sustain low frequencies. This may seem odd until you think about the physical size of audio waves at various frequencies. For example, a 50 Hz wave is about 22.6 feet long. So a room that is 45 feet on the diagonal is going to regenerate low frequencies more effectively than a room that is 15 feet on the diagonal.
Power User Tip: To calculate how big an audio wave is, divide the speed of sound—1,130 ft./second—by the frequency. For a 50 Hz wave, 1,130/50 = 22.6 ft.
When a room’s width or length correlates directly to the size of a waveform at a specific frequency, a standing wave can occur where the initial sound and the reflected sound begin to reinforce each other. Let’s say we have a long, narrow room where the distance from one side to the other is 22.6 feet. When a 50 Hz wave bounces off the wall, the reflective wave travels right back along the same path and bounces off the other wall and cycle repeats. In a room such as this, 50 Hz reproduces very well, maybe too well. So any mix will have a heavier low-end.
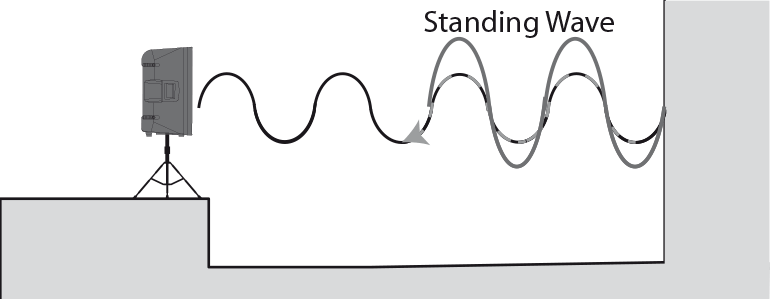
Additionally, low frequency waves are powerful enough to cause the walls, ceiling, and even the floor to flex and move. This is called diaphragmatic action, and it dissipates energy and strips away the low-end definition. So if you’re in an old cotton mill, and the walls and floor are made of thick concrete that don’t vibrate much, the bass response is going to be much more powerful than if you’ve set up a show in an old warehouse where the walls are made of barge board and tin.
1.1.1 Wall Loading Effect
Very low frequencies are not directional, so they radiate out of the sides and back of the loudspeaker, as well as out of the front. If you place a loudspeaker against a wall, the rear sound propagates back into the room. This can increase output of bass frequencies as much as 6 dB if placed near one wall (half-space loading), 12 dB if placed near two walls (quarter-space loading) and as much as 18 dB if you put the loudspeaker next to the ceiling or on the floor in a corner (eighth-space loading).

In order to have the most control over your sound, it’s best to always start with the flattest response, so you normally should avoid wall and corner placement. On the other hand, if you need some extra bass boost, this technique may be worth a try. It is important to be aware of what’s happening and be prepared to take advantage of it or compensate for it.
Power User Tip: Because a floor monitor placed on the stage is unavoidably subject to half-space loading, the Monitor Preset on your AIR-series full-range loudspeaker is specifically designed to compensate for bass buildup and maintain a tight mid-bass response.
1.1.2 Maintain a High Direct-to-Reverberant Ratio
 Another way a room interacts with sound waves is through reflectivity. Like most room anomalies, reflections can be good and bad. Consider the effect of a cathedral’s reflections on a choir or a piano. This type of reverberation (reverb) is quite desirable. But not all reverb is good reverb. Reflections can also cause comb filtering. For example, if a speaker is placed near a reflective surface (such as a concrete wall), the direct sound coming from the speaker and the reflected sound coming from the wall can arrive at the listener’s ears out of phase with each other, causing cancellation and reinforcement. If they’re 180-degrees out of phase with respect to each other, they will cancel each other out.
If you are using your loudspeakers in a reverberant environment, position them so that as much sound as possible is focused on the audience area and steered away from reflective surfaces. AIR-series full-range loudspeakers have a nominal 90-degree horizontal and 60-degree vertical coverage pattern. When you do your placement and positioning, it’s a good idea take some time to do a “walk around” of your loudspeakers, playing either pink noise or program material, so you get a feel for how the sounds are translating into the room.
2 System configuration suggestions
The following subsections will demonstrate some system configurations for common rooms. The size and shape of your room and the application for which it will be used determine, to a large extent, how many speakers you will need and where they should be placed. In every situation, keep in mind your loudspeaker’s coverage pattern.
Every full-range AIR series loudspeaker offers offer the same 90˚H x 60˚V coverage pattern. Be sure to pay close attention to these angles when using your speakers. Rotating the cabinet changes the horizontal and vertical coverage.
When configured for stereo use, make sure the cabinets are not placed too wide for the room or too far back into the corners. Too wide of a placement will direct too much energy onto the walls and can potentially add destructive interference to the room. Adjust the left and right speakers, as well as the toe-in angle, to produce the best stereo image. If a room is very narrow, a mono cluster might be a better choice than stereo.
2.1 Vertical Coverage
It is important to keep in mind that vertical coverage is just as important as horizontal coverage. If you are using a ground stack approach with pole mount, make sure your coverage matches the listening plane. Suspension of speakers will provide even further control.
Each AIR-series full-range loudspeaker features dual-position pole mounts. Using the 7.5˚ downward tilt mount will focus the loudspeaker’s energy onto the audience and avoid destructive reflections. This is ideal for situations where the loudspeaker is mounted atop a tripod stand and placed on a stage, or where the pole-mounted loudspeaker is on the floor and the coverage area is relatively shallow (conference, coffee house, etc.).
Flat Floor with Stage

Elevated Floor

No Stage Flat Floor

2.2 Horizontal Coverage
The 90˚ horizontal dispersion pattern of the AIR-series loudspeakers provides coverage for a variety of applications. When creating a sound system, it is important to place loudspeakers so that there is a smooth transition from one loudspeaker’s coverage area into the the next loudspeaker’s coverage area. This will create an even response throughout the listening space. The rest of this section provides some examples of using speakers with one another to provide the best coverage.
2.2.1 Stereo System

A stereo system allows panning and adds depth to the acoustic image. This is good for speech reinforcement and greatly enhances live or pre-recorded music. Locate speakers to give the best horizontal coverage. Ensure that the listeners are well covered by the pattern.
2.2.2 Mono Cluster with Down Fill

Center or mono systems can provide a simple, economical solution for venues where speech intelligibility is the priority, rather than music. As with a stereo system, make sure the coverage pattern of the speaker focuses the energy on the audience.
This graphic actually shows two speakers. The upper speaker is for throwing to the back of the room, and the lower speaker covers the space in the front of the room, closest to the stage.
2.2.3 LCR Systems

An LCR system is a stereo system with a center speaker added. This configuration allows panning and adds depth to the acoustic image. This type of system will provide more control than a basic stereo system and is ideal in situations where music and speech intelligibility are equally important.
4.2.4 Monitor Systems

Above is a typical stage-monitor layout for a five-piece band. For musicians (such as a vocalist) who don’t require a lot of low-frequency energy in their floor wedge, we suggest using an AIR10. For musicians that need a little more bass, the AIR12 or AIR15 is preferable. The drum monitor in this example is a full-range, 3-way system (AIR15 atop AIR18s). For smaller stages, an AIR15 atop a low tripod or in the horizontal floor-wedge position will be more than adequate.
3 Adding a Subwoofer (Or Two)
Adding a subwoofer to your AIR-series sound system allows your system to run more efficiently because the low-frequency content is reproduced by your subwoofer instead of your full-range system. This section will guide you through getting the most out of your AIR-series subwoofers.
3.1 Sub Alignment
The AIR-series subwoofers have been designed to be customized for use with any full-range loudspeakers. Both the AIR15s and AIR18s feature a variable alignment delays to guarantee that your 3-way system stays in alignment.
The Alignment delay setting compensates for the cancellation or reinforcement of low frequencies when the same frequencies are reproduced by two sound sources that are set some distance apart. Low frequencies in the crossover region between full-range and subwoofer have wavelengths that are several feet long—the wavelength of a 150 Hz wave is about 7.5 ft—which means that reinforcement and cancellation will occur as the waves interact in the room. The Alignment delay provides compensation for this effect when the loudspeaker is about the same distance away from, or in front of, the subwoofer, as specified in the setting. As room acoustics will influence effectiveness, we recommend listening tests using the different Alignment settings, in conjunction with alternate Polarity settings, to determine the best results.
To calculate the correct delay setting for a custom installation, or if the subs must be located some distance from the main speakers, you will need to do some calculating.

- Find the spot in the room where coverage from the main speakers and the subwoofers overlap.
- Measure the distance from the overlap area to each speaker location.
- Subtract the smaller distance (the distance to the subwoofer) from the larger distance (the distance to the full-range loudspeaker).
- Divide that number by 1,100 and apply that delay value to the subwoofer. Keep in mind that the overlap area may be behind FOH.
Even for mobile applications, where the subwoofer is relatively close to the full-range loudspeakers, aligning the subwoofer to its full-range companion will yield tighter bass response:
Sub-pole mounted. When your full-range speaker is mounted directly atop your AIR-series sub, no delay is necessary.

Tripod mounted. When the subwoofer is about one meter from the full-range loudspeaker—a typical distance when the loudspeaker is on an adjacent tripod stand, set the delay on your AIR subwoofer to about 2.9 ms.

Full-range onstage. When the full-range loudspeaker is on stage and the subwoofer is on the floor, the typical distance is around 2M. Set the delay on your AIR subwoofer to about 5.9 ms.

3.2 Cardioid Array
Most subwoofers are essentially omni-directional. This means that they radiate sound around the entire cabinet, including the stage. Subwoofer energy can cause feedback on stage as well as make monitoring more difficult. Additionally, when two subwoofers are arranged on each side of the stage in a traditional stereo configuration, there can be a build-up of energy. The resulting “power alley” is created by energy from each subwoofer arriving at the same time and in phase with each other summing together. Unfortunately, moving left or right of this center summation, one will find cancellation alleys.

Creating a cardiod subwoofer array forms a more direction radiation pattern that keeps energy off of the stage and in the audience where it is needed more.

AIR-series subwoofers make this quick and easy. To build a cardiod array with two AIR-series subwoofers, first stack two AIR15s or two AIR18s one on top of the other, with the top subwoofer facing away from the audience and toward the stage. Or place two AIR15s or two AIR18s side by side with one sub facing the audience and the other facing the opposite direction.

On the cabinet facing away from the audience, enter the DSP menu and select Cardioid in the Locate options field.
Your two AIR-series subwoofers will now radiate in a directional cardioid pattern allowing you greater steering control over your low-frequency energy.
Power User Tip: If you are delaying your subwoofer array to your full-range systems, be sure to set the same delay time on both subwoofers.
3.3 Setting the Low Pass Filter
AIR-series subwoofer are equipped with a variable low-pass filter allowing you to dial in the best crossover point for your system.
- To begin, push the encoder button and scroll to the Sub field. Set the low-pass filter to the highest frequency (150 Hz). This will create an overlap between your AIR-series subwoofer and your full-range system’s frequency response.
- Play program music with a lot of bass in it through your full system.
- Experiment with the polarity setting on your AIR-series subwoofer to see which position provides the best bass response. Leave the polarity in the position that provided the loudest bass response. This means that your subwoofer is in phase with your full-range speaker.
- From this point, you can experiment with the lowpass filter setting until you find the one that provides the smoothest crossover transition while listening to your favorite music.
Power User Tip: If you are using your AIR-series subwoofer with an AIR-series full-range loudspeaker, PreSonus has created presets for each full-range model that are optimized for that loudspeakers. For example, if you are using an AIR15s with an AIR10, set the Sub frequency to “AIR10.” This will set the low-pass filter on your AIR15s to the correct setting for you AIR10.
4 Installation Guidelines
This section has been created as a reference for safe rigging and mounting practices. It is not an installation tutorial. PreSonus AIR-series loudspeakers are professional products and not intended for consumer use. Installation of AIR-series Loudspeakers should only be undertaken by a qualified systems integrator or a professional rigger. Every audio project is unique and a licensed and insured professional should be consulted to guarantee the safety and performance of the installed system. The installer must have a complete understanding of the design intent as well as knowledge of safe installation techniques to create a successful project.
Understanding safe rigging and mounting practices will provide these benefits:
- Proper coverage of listening area with accurate speaker placement.
- Best installation methods will be utilized with regard to safety, performance, aesthetics, and cost.
- Minimal wasted time during installation.
4.1 Ground Stacking
AIR-series full-range loudspeakers have nonskid rubber feet on the bottom for upright front-of-house use and nonskid rubber feet on one side for stage-monitor applications.
If your application is primarily portable, PreSonus Loudspeakers can be easily ground stacked and configured for a variety of venues. When ground stacking, make sure all speakers are securely anchored to the floor using load straps or other anchors. Rubber mats can also be utilized between cabinets to prevent boxes from “walking.” This is particularly important if the speakers are accessible to the public.
Check that the surface the speakers are to be stacked on is level, even, and has sufficient structural integrity to support the speakers. If ground stacking on a portable stage, make sure you know what is directly below the speaker stack.
WARNING: Placement on improper or unstable surfaces could cause the loudspeaker to topple, which could result in serious injury or death.

4.2 Pole Mount
Full-range AIR-series loudspeakers are equipped with 35 mm pole socket that allows the speaker to be mounted on a speaker stand or on a pole over an AIR15s or AIR18s subwoofer. This pole socket allows for straight 90˚ vertical mounting or for tilting the full-range loudspeaker down 6˚ while on a pole.
When using a tripod speaker stand, extend the legs to provide the most stable support to the speaker so that it cannot be tipped over. It is highly recommended that tripod stands be placed away from foot traffic. If the stands are to be used outdoors, theatrical sand bags may be placed on the legs to provide some protection against wind load. When using the tilt-mount, make sure that one of the tripod legs is oriented directly below the tilt angle.
AIR-Series full-range loudspeakers also may be mounted on top of an AIR-series subwoofer using the optional SP1BK threaded subwoofer pole. This pole was designed to be secured the AIR-series subwoofer and has been pull- and tilt-tested for safety with both full-range AIR-series loudspeakers.
WARNING: Do not substitute a longer pole from a third-party supplier. Use of a longer pole than specified could cause instability, which in turn could result in serious injury or death.
WARNING: Use proper lifting techniques and safety precautions when mounting an AIR-series loudspeaker on a the SP1BK Subwoofer Pole or a speaker stand. When mounting atop a speaker stand, verify that it is rated to support the weight of your AIR-Series loudspeaker. The weight of each model can be found in your Owner’s Manual.
WARNING: Placement on improper or unstable surfaces could cause the loudspeaker to topple, which could result in serious injury or death.

4.3 Suspension Guidelines
WARNING: Failure to observe the following safety precautions may result in severe injury or death. Installations such as described in this guide should only be attempted by a trained professional.
- Inspect all the components associated with the project for damage before assembly. Any suspect parts should not be used, and the component manufacturer should be contacted to arrange for replacement parts.
- Read all instructions shipped with selected speaker or rigging products. Make sure you fully understand all components.
- Always make sure that the structure the loudspeaker is to be suspended from has been approved by the building or structural engineer and will support the weight of all the components of the speaker system including speakers, speaker cable, wire rope, etc.
- Make sure all installation crew members are trained for loudspeaker rigging and mounting and are in compliance with applicable local laws. Local government offices can help with this information.
- Make sure that all relevant health and safety regulations are known and followed by the installation crew.
- Suspended installations must be completed or supervised by a certified rigger.
- The system should be designed so that it is a static suspension. There should be no dynamic or shock loading.
- Personal protective equipment (hardhats, steel-toed footwear, safety glasses, etc.) should be worn at all times by the installation crew.
- If called for in the design, make sure all installation personnel are trained to work at height and have certifications for scissor lifts, theatrical hoists, etc.
- Make sure all lifting equipment (slings, span-sets, deck chain, scaffolding, etc.) is in good working order. Thoroughly inspect all components prior to use.
- Keep a tidy workplace. Do not leave tools, rigging items, etc., on top of loudspeakers during installation. Loose items can fall and cause injury.
- Never leave the system unattended during the installation process. Make sure that the workspace is isolated from public access. No one should be allowed to pass beneath the loudspeakers during installation.
- Do not suspend any other components or loudspeakers from PreSonus AIR-series loudspeakers.If secondary steel safeties are required, they should be installed once the entire system is at operating height and before public access is allowed.
4.3.1 Suspending the Loudspeaker
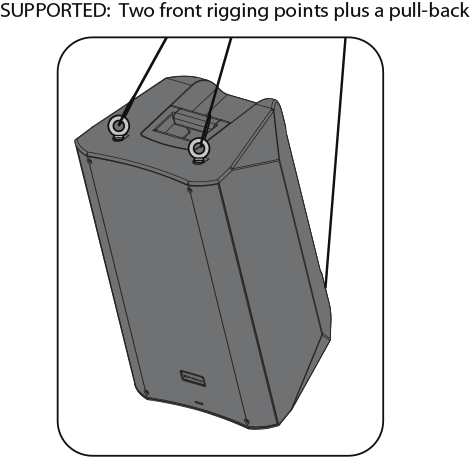
A minimum of three suspension points must be used per speaker to safely suspend the AIR-series full-range loudspeakers. Two wires fixed symmetrically to the front of the cabinet to hold the weight and one wire attached to the back for tilt will satisfy this requirement. Select the strongest overhead structure available for the two front points and, if possible, two independent points to allow one to act as a backup. Attach the two front points first and then adjust tilt angle to ensure the load is safely suspended during installation. If additional pan or height adjustments are needed, make sure to follow this rule as well.
Do not suspend any other items from PreSonus AIR-series loudspeakers.

PreSonus offers an M10 Kit that includes four (4) forged-shoulder steel M10 eyebolts. This kit is to be used with the AIR10, AIR12, and AIR15 M10 suspension points. These bolts are specifically designed for safe suspension of PreSonus AIR-series Loudspeakers and must not be substituted. These eyebolts are not a common hardware store item. Please read all included information. A minimum of three (3) eyebolts per per full-range cabinet.
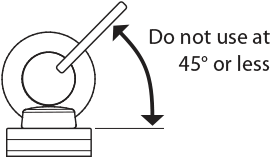
When using the M10-Kit, please remember that the eyebolt strength rating will vary with the pull angle. It is extremely important to observe appropriate pull angles when suspending any loudspeaker with eyebolts. Suspending an object with eyebolt should always be done in a way that ensures the resultant forces are within the allowed pull angles.
4.3.3 Precautions
AIR-series loudspeakers, like all electrical devices, must be protected from liquids or excessive moisture. They are not designed for outdoor use during inclement weather. If you are using your AIR-series loudspeakers outside when rain or other moisture-laden weather occurs, immediately power down your loudspeakers and protect the cabinets with waterproof coverings.
The amplifiers in AIR-series loudspeakers are convection cooled via the rear-panel heatsink. Free airflow must be maintained around and behind the heatsink, with a minimum clearance of six inches behind the cabinet. Make certain the heatsink is kept clear of any adjacent materials, such as stage curtains, that could impede airflow.